
8.6.2.1. Stage 1 of Creating A New KYC Profile - General
vThe first stage of creating a new KYC Profile is the “General” stage.
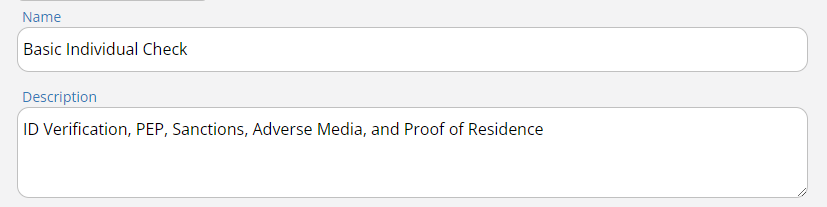
Here, start by choosing a name for the profile that clearly tells what it’s for, such as ‘Basic Individual Check’ or ‘IDv Only’. Then, write a description that gives more details about what the profile includes, like ‘ID Verification, PEP, Sanctions, Adverse Media, and Proof of Residence’.
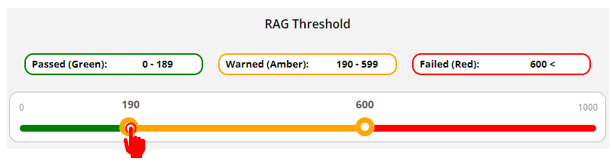
Once the name and description have been entered, you can establish the RAG Thresholds by adjusting the slider to the chosen values.
In addition, the Platform enables you to adjust specific check parameters. This will come in handy, for example, when you wish to reduce “false-positive” results.
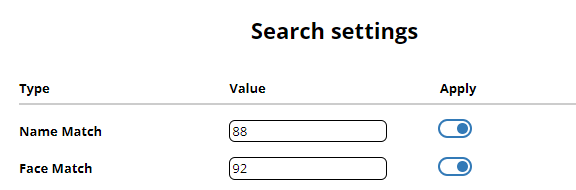
“Name Match” - The Platform can filter possible results on the basis of names and date of birth.
The higher the “Name Match” percentage (“Value”) set here, the less “false positive” results you may receive (however, if set too high, it may reduce the chance of obtaining information on your potential target).
Be aware, that changing the namematch % will have an impact on your search criteria i.e. Individual searches / corporate searches. All new Individual and corporate on-boardings will use latest namematch % if updated on this KYC profile. It will also update the monitoring threshold % on your existing monitored clients as well. For example - If a client is monitored on 90% previously then after the namematch update to 92% , all new on-boardings will start using the new namematch % as 92 for both searches and monitoring (if client is green and added) alongwith It will also be updated on all your existing clients as 92% on this KYC profile. It is also important to remember that you will receive PEP/Sanction/AdverseMedia monitoring alerts for namematch 92% and above only. There is no impact on corporate monitoring alerts in this case. Note, that the higher the %, the lower the potential number of alerts, and vice versa.
Note: While providing a DoB is not mandatory for PEP, Sanction, and Adverse Media checks, inserting an accurate DoB can be instrumental in obtaining precise search results. Naturally, entering an incorrect date of birth may have an opposite effect on the results.
Also note, that the backend systems may default the DoB to a range of +/- 1 year, so if the authorities do not have the actual date of birth range of the person, data about them may still be captured.
“Face Match” refers to Liveliness. The Platform engine analyses the images captured by the client during the Liveliness process and compares them with the photo from the submitted ID. Here, the higher the “Face Match” value set, the higher percentage of match will be required between the ID and the captured images.

“Min Image Quality Score” is an on-demand ID pre-validation feature. It enables you to make sure the image quality of the uploaded ID is sufficient for the performing the identification process, before it is actually checked. Meaning, the uploaded identification document is verified to ensure it meets the minimum required standards prior to submission for the final verification process.
(This functionality should be requested via support@muinmos.com as this verification incurs a cost of GBP 0.15 per upload attempt)
TIP : Set the parameters at a level that’s accurate enough to identify correct matches, but also practical to avoid too many irrelevant results. For example, decreasing the percentage threshold within the “Name Match” settings may lead to an increase in false positives.
When it comes to “Min Image Quality Score” the default/recommended value is 50%, as 0% will never trigger the pre-validation feature and 100% would require the highest possible image quality and a flawless upload process.
Tip: Creating A New KYC Profile from A Template
If you intend to replicate certain rules or settings from an existing profile, you may easily do so by employing the “Templates” feature.
How to reach the templates - Upon pressing “Create” in the KYC Profiles main screen, a pop-up screen will appear. In its upper left corner a “Tempaltes” drop-down menu will appear. Dropping down the menu will show you the available KYC Profile templates.
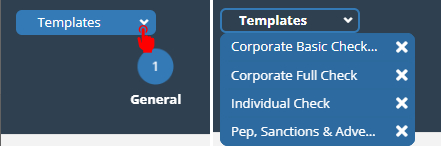
Creating KYC Profile templates - The Platform is provided with several KYC Profiles already added to the templates. This, for your convenience only.
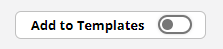
In order to add another KYC Profile to the templates, simply go to any enabled KYC Profile, press “Edit”, and in the screen that will appear, press “Add to Templates”.
Let us now proceed to the second stage of creating a new KYC Profile - the “Rules” stage.